This step-by-step guide explains how to install and configure an FTP server for file sharing on Windows Server and Windows 10/11. These systems include a built-in FTP server role based on the IIS web server.
Installing the FTP Server and Creating an FTP Site
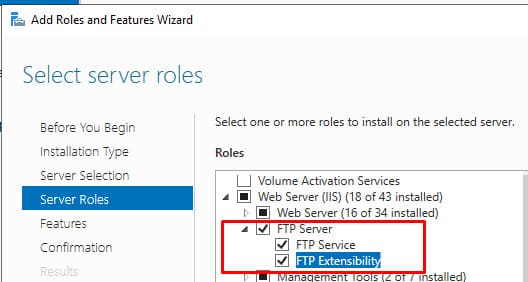
To install the FTP server role on Windows Server, open Server Manager and launch the Add Roles and Features wizard.
Expand the Web Server (IIS) role → FTP Server and select the FTP Service and FTP Extensibility options.
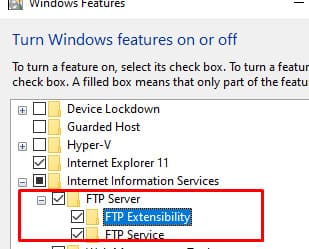
On Windows 10 and 11, install the FTP server components via the Turn Windows features on or off console (run optionalfeatures). Expand Internet Information Services and select the FTP services for installation.
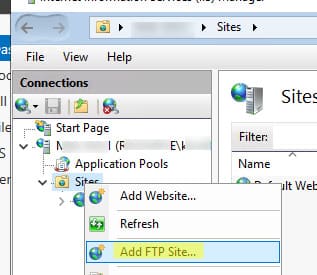
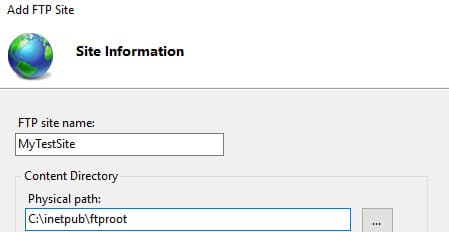
After installing the role, create an FTP site using the IIS Manager console (inetmgr). Select Sites → Add FTP Site and specify:
– FTP site name: MyTestSite
– FTP site root directory: C:\inetpub\ftproot
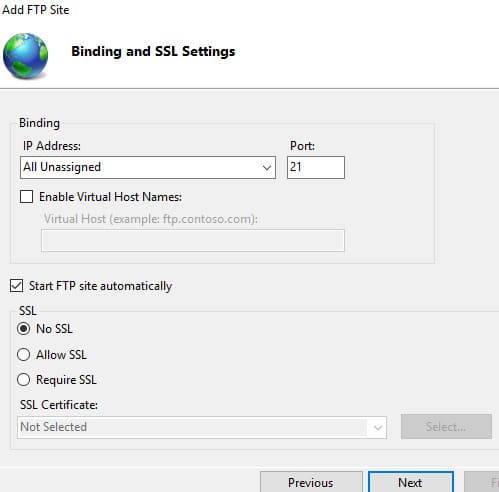
When selecting a certificate for traffic encryption, choose No SSL if encryption is not required.
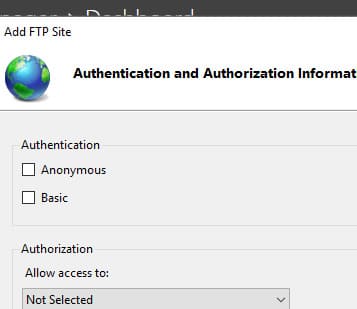
For Authentication and Authorization, leave the default settings (access permissions will be configured later).
Configuring FTP Server Access Permissions in Windows
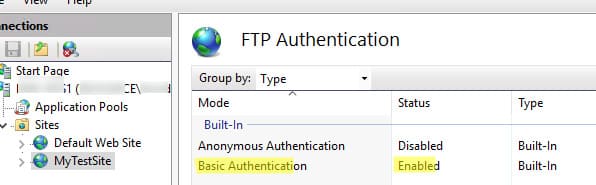
The FTP server in Windows supports two types of user authentication:
– Anonymous Authentication — Any user can connect to the FTP server using the username “anonymous” or “guest” and any email address as the password.
– Basic Authentication — Requires a domain or local user account for connection.
Enable only Basic Authentication for enhanced security (in the site settings, expand FTP Authentication and enable this mode).
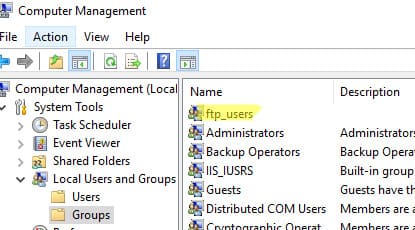
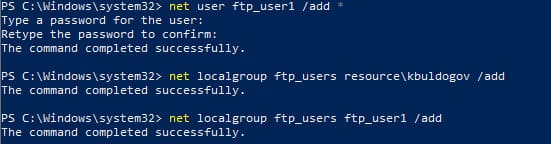
Create a local group ftp_users and add users to it:
net user ftp_user1 /add *
net localgroup ftp_users ftp_user1 /add
Add a domain user to the same group:
net localgroup ftp_users winitpro\kbuldogov /add
Grant RW permissions to the C:\inetpub\ftproot directory for the ftp_users group.
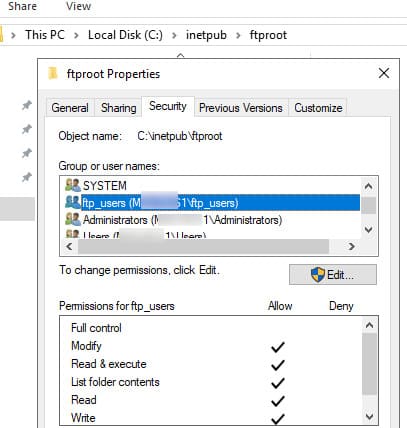
In the FTP management console, select FTP Authorization Rules → Add Allow Rule and create a rule for the ftp_users group with Read and Write permissions.

Users can now connect to the FTP server using any third-party FTP client or directly from Windows Explorer.
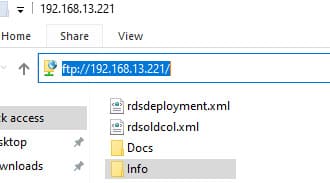
In Windows Explorer, enter the FTP server address in the format ftp://192.168.13.221/, provide the user credentials, and enter the password.

Users should see the list of files and folders on the FTP server.
By default, all users connect to the root of the FTP site and see all files. The FTP server in Windows supports user isolation mode, where each user is restricted to their own directory.
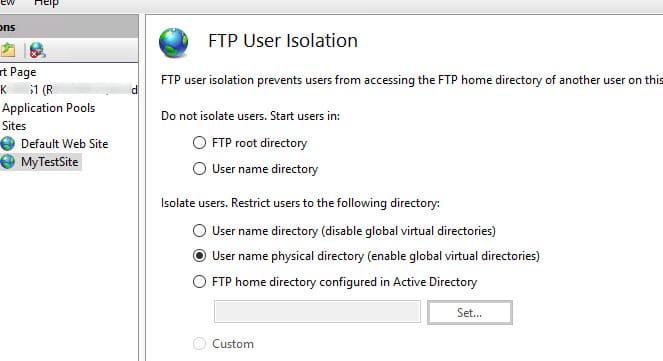
Configuring FTP User Isolation in Windows
To restrict users to their own folders, enable user isolation mode (in the FTP User Isolation settings). Available modes include:
– User name directory (disable global virtual directories) — Users see only their own directories.
– FTP home directory configured in Active Directory — Users are isolated to their home directories specified in Active Directory settings.
The following three options represent different user isolation modes:
User name directory (disable global virtual directories) — The FTP session is restricted to a directory matching the user’s FTP username. Users see only their own directory (treated as the root) and cannot navigate to parent directories in the FTP structure. Global virtual directories are ignored.
User name physical directory (enable global virtual directories) — The FTP session is restricted to a physical directory matching the user’s FTP account name. Users cannot navigate above their directory in the FTP structure but have access to all global virtual directories.
FTP home directory configured in Active Directory — Users are isolated to their home directory specified in Active Directory settings (via FTPRoot and FTPDir properties).
Create personal directories for users based on their accounts:
| Account Type | Home Directory Naming Syntax |
|---|---|
| Anonymous Users | %FtpRoot%\LocalUser\Public |
| Local Windows Account | %FtpRoot%\LocalUser%UserName% |
| Windows Domain Account | %FtpRoot%%UserDomain%%UserName% |
| Special IIS Manager or ASP.NET Accounts | %FtpRoot%\LocalUser%UserName% |
In this example, for two users, create the following directories:
– Local user ftp_user1: C:\inetpub\ftproot\LocalUser\ftpuser1
– Domain user resource\kbuldogov: C:\inetpub\ftproot\resource\kbuldogov
Users will now only see their personal directories when connecting to the FTP server.
Quick FTP Server Setup Using PowerShell
For rapid FTP server deployment, use PowerShell:
1. Install the FTP server role on Windows Server:
Install-WindowsFeature Web-FTP-Server -IncludeAllSubFeature -IncludeManagementTools
2. Install FTP components on Windows 10 and 11:
Enable-WindowsOptionalFeature -Online -FeatureName IIS-FTPServer
Enable-WindowsOptionalFeature -Online -FeatureName IIS-FTPSvc
Enable-WindowsOptionalFeature -Online -FeatureName IIS-FTPExtensibility
3. Create a user and group for FTP:
$pass = ConvertTo-SecureString "P@ssw0rd!" -AsPlainText -Force
New-LocalUser -Name ftp_user1 -Password $pass
New-LocalGroup -Name ftp_users
Add-LocalGroupMember -Group ftp_users -Member ftp_user1
4. Create a directory and grant access permissions:
$ftproot='C:\inetpub\ftproot\MyFTP'
mkdir $ftproot
New-WebFtpSite -Name MyFTP -IPAddress "*" -PhysicalPath $ftproot -Port 21
icacls $ftproot /grant "ftp_users:(OI)(CI)(F)"
5. Allow connections without SSL:
$FtpSite="IIS:\Sites\MyFTP"
Set-ItemProperty $FtpSite -Name ftpServer.security.ssl.controlChannelPolicy -Value "SslAllow"
Set-ItemProperty $FtpSite -Name ftpServer.security.ssl.dataChannelPolicy -Value "SslAllow"
6. Enable basic authentication:
Set-ItemProperty $FtpSite -Name ftpServer.security.authentication.basicAuthentication.enabled -Value $true
7. Grant site access to the group:
Add-WebConfiguration "/system.ftpServer/security/authorization" -Location MyFTP -PSPath IIS:\ -Value @{accessType="Allow";roles="ftp_users";permissions="Read,Write"}
8. Create a Windows Defender Firewall rule:
New-NetFirewallRule -Name "FTP 21" -DisplayName "FTP 21" -Profile All -Direction Inbound -Action Allow -Protocol TCP -LocalPort 21 -Program "%windir%\system32\svchost.exe"
9. Restart the FTP site:
Restart-WebItem -PSPath $FtpSite
10. Verify FTP server availability:
Test-NetConnection -ComputerName yourftpservername -Port 21
By following this guide, you can set up and configure an FTP server on Windows Server or Windows 10/11 for convenient file sharing between devices.