On a Windows computer with multiple network adapters (e.g., Ethernet, Wi-Fi, VPN), it may be necessary to manually adjust the priorities of network connections to ensure proper traffic routing. For example, if a computer is simultaneously connected to Wi-Fi and Ethernet, you can configure priorities to route traffic through the wired connection by default.
You can purchase original Windows product keys from our catalog from 7.50 €.
How Windows Determines Network Adapter Priorities
Windows automatically assigns priorities to network adapters based on connection speed. The higher the connection speed, the higher the priority (lower metric value). By default, Windows typically assigns priorities in the following order:
– Ethernet
– Wi-Fi
– Mobile connections
If your computer is connected to both a wired network via Ethernet and a high-speed Wi-Fi router, the wireless connection may take higher priority.
Step 1: Checking Network Adapter Priorities
To view the priorities of network adapters in Windows, use a PowerShell cmdlet. Run the following command:
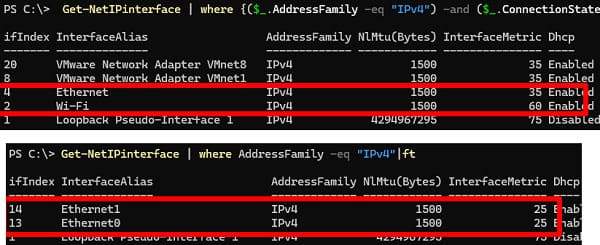
Get-NetIPInterface | where AddressFamily -eq "IPv4"
The InterfaceMetric value determines the priority of the network adapter: a lower metric indicates a higher priority. In the Windows routing table, traffic is routed by default through the interface with the lowest metric.
The screenshots below show the results of the command from two different computers. The first screenshot shows that the Ethernet connection has a higher priority than the Wi-Fi adapter. The second screenshot shows two Ethernet interfaces with the same priority.
The InterfaceMetric value sets the priority of the IP route for that network adapter in the Windows routing table:
route print

In this routing table, it’s clear that network traffic will be sent by default through the interface with the lowest metric.
You can use PowerShell to check which network adapter will be used for internet access based on the current routing table:
Get-NetRoute -DestinationPrefix 0.0.0.0/0

In this case, there are two routes with identical metrics, meaning you cannot guarantee which adapter will be used for internet access.
Step 2: Changing Priorities with PowerShell
To manually change the priority of a network interface, use the Set-NetIPInterface cmdlet. To lower the priority of an interface, specify its InterfaceAlias or ifIndex and set a new metric value:
Set-NetIPInterface -ifIndex 14 -InterfaceMetric 26
or
Set-NetIPInterface -InterfaceAlias Ethernet1 -InterfaceMetric 26
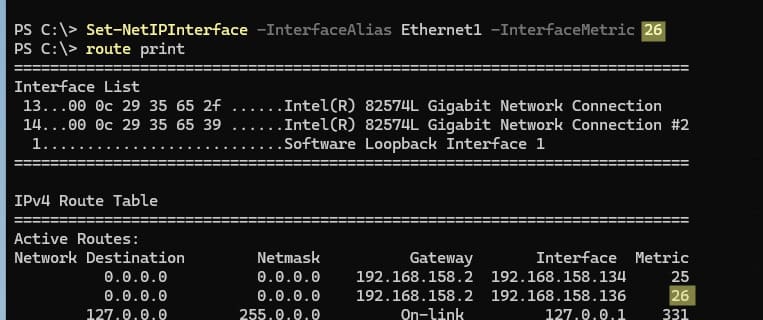
After running the command, verify the changes in the routing table to ensure the metric has been updated.
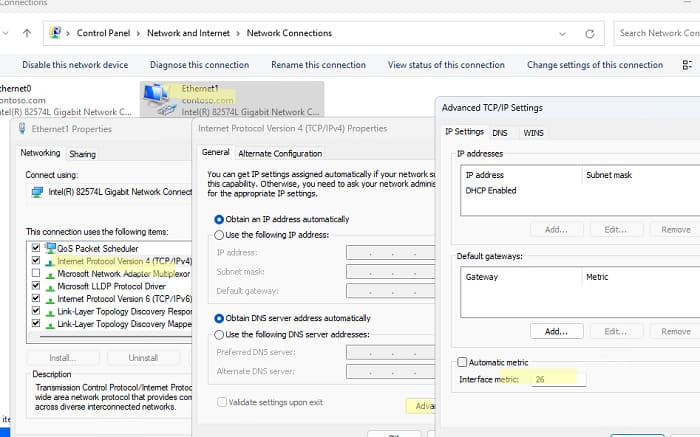
Step 3: Changing Priority via Control Panel
If you prefer a graphical interface, you can adjust the network adapter priority through the network connection properties:
1. Open Control Panel and navigate to Network Connections (ncpa.cpl).
2. Locate the desired adapter, open its properties, select IPv4, and click Advanced.
3. In the advanced settings window, uncheck Automatic metric and enter the desired value in the Interface metric field.
4. Apply the changes.
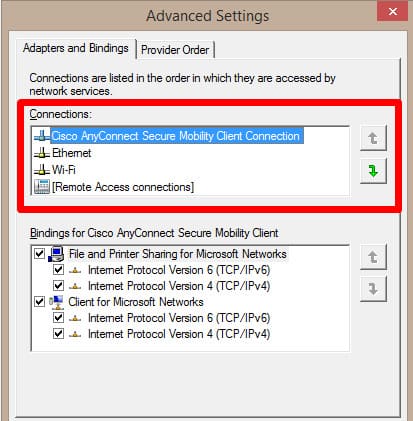
Step 4: Changing Adapter Bindings in Older Windows Versions
In earlier versions of Windows (before Windows 10 and Windows Server 2016), network adapter priorities could be adjusted through the Adapters and Bindings settings. This option has been removed in newer Windows versions.
Configuring network adapter priorities in Windows allows precise control over which connection handles the primary traffic. Using PowerShell or Control Panel, you can easily adjust the metric and set the priority of a network connection for optimal system performance.