Brute-force attacks remain one of the most common threats to RDP servers. Attackers exploit weak or compromised passwords to gain system access. This threat stems not from vulnerabilities in the RDP protocol but from poor password security policies, making it particularly dangerous.
RDP with SSL and Network Level Authentication (NLA) is secure enough for use without a VPN, provided the operating system is up-to-date with all updates installed. However, passwords remain a weak point, and Windows’ default tools do not protect against brute-forcing. This guide explains how to use the Connection Tracking mechanism to effectively protect against brute-force attacks.
How Connection Tracking Works
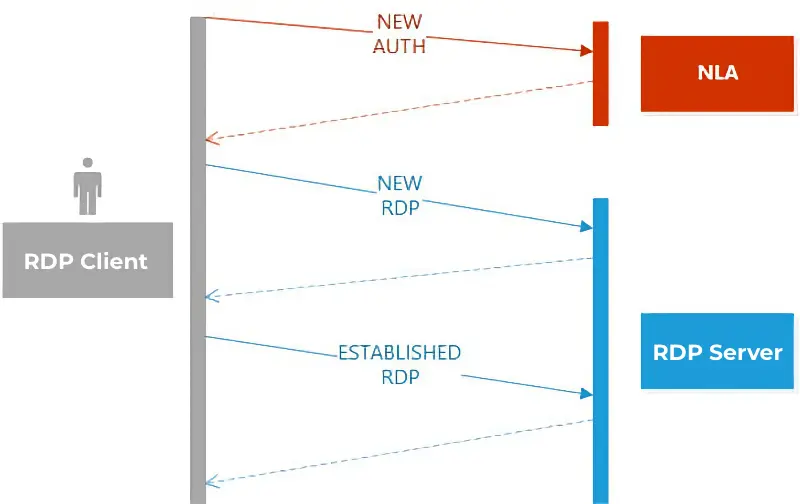
Connection Tracking analyzes the state of connections and packets, classifying them into four states:
– NEW: A new packet not associated with any existing connection.
– ESTABLISHED: A packet belonging to an existing connection.
– RELATED: A packet related to an existing connection (e.g., additional FTP connections).
– INVALID: A packet that does not match the above states.
During RDP operation, the client first authenticates. If credentials are incorrect, each new attempt generates a NEW state packet. Upon successful authentication, an RDP session is established, and packets transition to the ESTABLISHED state.
A high number of NEW packets sent in a short time indicates a potential brute-force attack.
Step 1: Creating a Suspicious Address List
We will use the Address List mechanism and the Mangle table to track IP addresses sending excessive NEW packets.
1. Open IP → Firewall → Mangle and create a new rule:
– Chain: forward
– Protocol: tcp
– Dst. Port: 3389
– Connection State: new
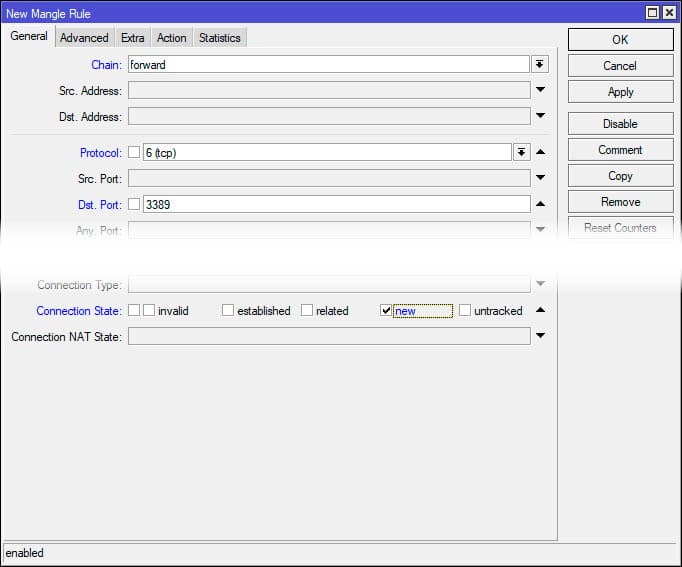
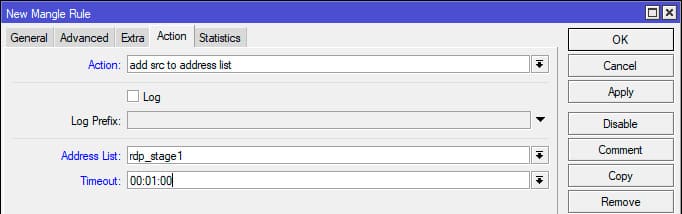
On the Action tab:
– Select Add src to address list.
– Enter the list name rdp_stage1.
– Set Timeout: 1 minute.
Terminal command:
/ip firewall mangle add action=add-src-to-address-list address-list=rdp_stage1 address-list-timeout=1m chain=forward connection-state=new dst-port=3389 protocol=tcp
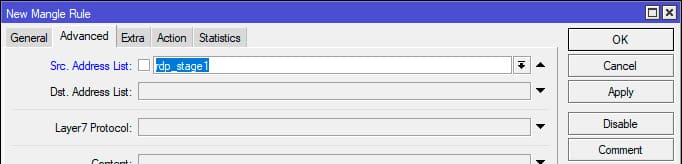
Step 2: Escalating Address Lists
Create sequential lists (rdp_stage2, rdp_stage3, etc.) to track repeated requests. If an address in rdp_stage1 sends another NEW packet, it moves to rdp_stage2.
Example command for the second stage:
/ip firewall mangle add action=add-src-to-address-list address-list=rdp_stage2 address-list-timeout=1m chain=forward connection-state=new dst-port=3389 protocol=tcp src-address-list=rdp_stage1
Repeat for rdp_stage3, rdp_stage4, and rdp_stage5.
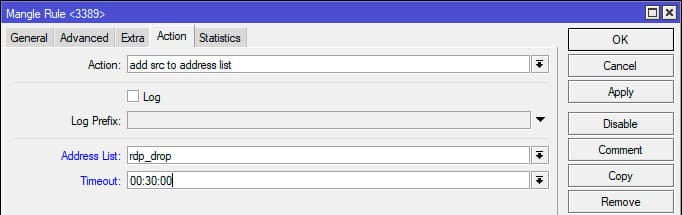
Step 3: Blocking Addresses
Once an address reaches rdp_stage5, it is moved to the rdp_drop list with a 30-minute block.
Create a new rule:
– Chain: forward
– Protocol: tcp
– Dst. Port: 3389
– Src. Address List: rdp_stage5
On the Action tab:
– Select Add src to address list.
– Enter rdp_drop.
– Set Timeout: 30 minutes.
Terminal command:
/ip firewall mangle add action=add-src-to-address-list address-list=rdp_drop address-list-timeout=30m chain=forward connection-state=new dst-port=3389 protocol=tcp src-address-list=rdp_stage5
How It Works
The source address of the first NEW packet is added to rdp_stage1 for 1 minute. If another NEW packet arrives from the same address within that time, it moves to rdp_stage2. This continues through rdp_stage3, rdp_stage4, and so on.
After the sixth NEW packet, the address is added to rdp_drop for 30 minutes. The block duration can be adjusted, but avoid overly long timeouts to prevent issues for legitimate users. For example, 30 minutes is preferable to 24 hours if an administrator is unavailable.
Important: Rules must be created in reverse order (from rdp_stage5 to rdp_stage1). This is because the add src to address list action does not stop packet processing, and the packet continues through the chain. If rules are created from first to last, a packet could be added to all lists, including rdp_drop, disrupting the logic.

For terminal configuration, the correct sequence is:
/ip firewall mangle

add action=add-src-to-address-list address-list=rdp_drop address-list-timeout=30m chain=forward connection-state=new dst-port=3389 protocol=tcp src-address-list=rdp_stage5

add action=add-src-to-address-list address-list=rdp_stage5 address-list-timeout=1m chain=forward connection-state=new dst-port=3389 protocol=tcp src-address-list=rdp_stage4

add action=add-src-to-address-list address-list=rdp_stage4 address-list-timeout=1m chain=forward connection-state=new dst-port=3389 protocol=tcp src-address-list=rdp_stage3

add action=add-src-to-address-list address-list=rdp_stage3 address-list-timeout=1m chain=forward connection-state=new dst-port=3389 protocol=tcp src-address-list=rdp_stage2

add action=add-src-to-address-list address-list=rdp_stage2 address-list-timeout=1m chain=forward connection-state=new dst-port=3389 protocol=tcp src-address-list=rdp_stage1

add action=add-src-to-address-list address-list=rdp_stage1 address-list-timeout=1m chain=forward connection-state=new dst-port=3389 protocol=tcp
To verify the rules, attempt an RDP connection while monitoring IP → Firewall → Address Lists. If successful, your source address should appear in rdp_stage1 and rdp_stage2.
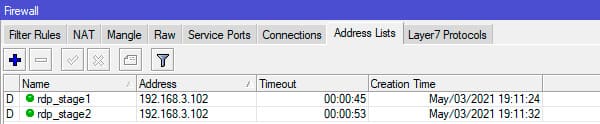
Test by failing authentication three times and succeeding on the fourth:
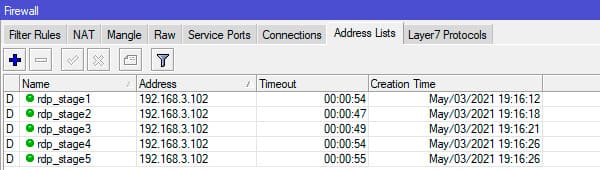
The results confirm the setup works as intended, allowing you to proceed with blocking without affecting legitimate users.
Step 4: Blocking Traffic
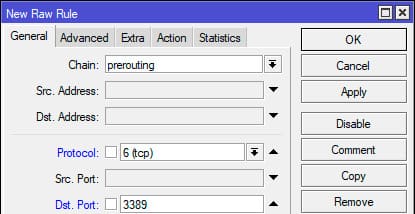
Block addresses in the rdp_drop list using the Raw table. The Raw table processes “raw” packet data before Connection Tracking, reducing router CPU load by filtering traffic early, which is critical for large address lists.
1. Open IP → Firewall → Raw and create a rule:
– Chain: prerouting
– Protocol: tcp
– Dst. Port: 3389
– Src. Address List: rdp_drop
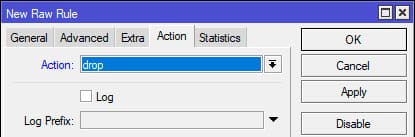
On the Action tab, select drop.
Terminal command:
/ip firewall raw add action=drop chain=prerouting dst-port=3389 protocol=tcp src-address-list=rdp_drop
Note: This setup blocks only RDP access for malicious IPs. Removing protocol and port restrictions would block the entire source, but this is not recommended. Even administrators may mistype passwords, and a full block could prevent network access. Blocking only RDP allows administrators to access the router and remove the block if needed.

The brute-force protection is now configured. Initially, periodically check the rdp_drop list to ensure legitimate users are not blocked. Adjust settings or inform users of the new rules as needed.
This approach is versatile and can be applied to any service, not just RDP. To configure it, determine the acceptable number of new packets for the chosen protocol and set a threshold for suspicious traffic.