In this article, you’ll learn how to create a work schedule in the Excel application. We’ll demonstrate the entire process and explain each step. This guide will be useful for both beginner users and those already familiar with Excel who want to explore new techniques.
You can purchase original Microsoft Office product keys in our catalog, starting at 7.00 €.
Step 1. Creating a Table and Auto-Filling Dates
1. Launch Excel and create a new blank workbook.

2. In the first row of the second column, enter the number “1” — this will represent the first day of the month.

3. To avoid manually entering the remaining days of the month, use the AutoFill feature:
– Select the cell with the number “1”.
– Hover the cursor over the bottom-right corner of the cell until a black cross appears.
– Hold down the left mouse button and drag the selection to the right up to the last date of the month.


4. From the icon that appears at the bottom, select the Fill option and extend it to the number 30 (for September).


Step 2. Adjusting Column Width
1. To improve the table’s appearance, adjust the column widths:
– Hover the cursor between column headers (e.g., between “A” and “B”).
– When a double-arrow icon appears, hold the left mouse button and drag the boundary left or right to resize.

Step 3. Adding Days of the Week
1. Below the date numbers, add the days of the week:
– Enter the day of the week under the first number (e.g., Wednesday).
– Use the AutoFill feature to automatically populate the remaining days of the week.


2. Select the rows with dates and days of the week, then apply center alignment.

Step 4. Merging Cells for Employees
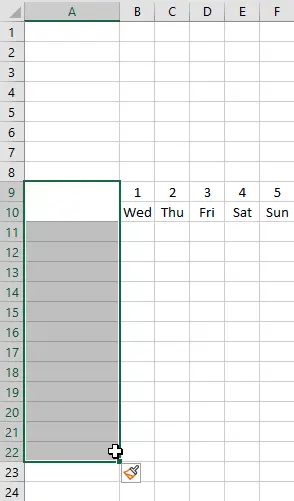
1. In the first column, add a list of employees.
2. Select two cells with employee names, then click the Merge & Center button.

3. Using AutoFill, copy the format and populate the column for all employees. Enter “Employee #1” and then drag to AutoFill.


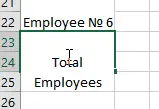
4. Below, add “Total Employees.”

Step 5. Adjusting Row Height for Text
1. To ensure text is fully visible in cells, adjust the row height:
– Hover the cursor over the line between rows (e.g., between “A” and “B”).
– Double-click the left mouse button to automatically fit the row height.

Step 6. Deleting or Adding Rows and Columns
1. To delete or add rows/columns:
– Hover the cursor over the row number or column letter.


– Right-click and select the desired action.

Step 7. Adding Borders
1. Select the entire schedule.
2. Click the arrow next to the border icon and choose All Borders.

3. Alternatively, right-click and go to “Format Cells.”

4. In the “Border” section, select “Outline” and click “OK.”

Step 8. Filling in Work Schedule Times
1. In each employee’s row, add work hours:
– In the first cell, enter a time range, e.g., 10:00 – 19:00.
– In the second cell, enter the number of hours (e.g., 8 hours, accounting for a lunch break)
2. If Excel automatically converts the time into a date when entered:

– Select the cell, go to Format Cells, and set the format to Text.

3. However, a better option is recommended since the text format prevents automatic calculations of employee counts or other numbers:
– Click the cell, press the spacebar, then enter the work hours. This ensures the number displays correctly without a date and allows for formula-based calculations.


Also you can do Middle Align and Center all

Step 9. Auto-Filling Repetitive Data
1. To fill multiple days with the same schedule using AutoFill:
– Select the cells with work hours, drag right, and right-click to copy the data since it will repeat, allowing you to paste it later.


2. For weekends, merge two cells and enter the letter “W” (for “Weekend”).


3. Now you can paste work hours from Wednesday to Sunday into empty cells by selecting them and pressing Ctrl+V. For weekends, copy from the previous week and paste into the next to avoid starting from scratch.


Step 10. Adding Vacations and Sick Days
1. Use the letter “V” for vacations and “S” for sick days.


– If you fill everything using copy-paste for repetitive data and AutoFill for new entries, your schedule should look something like this:

– You can also color-code cells by selecting them, clicking the color palette, and choosing your desired color.

2. Use conditional formatting to automatically fill cells with specific colors:
– Select all work hours data, go to the Home tab, choose Conditional Formatting, then New Rule.

– In the Format only cells that contain field, select Text, then enter the letter “W” and click “Format” at the bottom.


– Choose a fill color (e.g., green for weekends) and click “OK,” then “OK” again.


– This way, all cells with the letter “W” will automatically turn green, and any new or modified cell with “W” will also be colored green automatically.

– Repeat the process for “V” (vacation) and “S” (sick day), then create a small legend below to explain each color.

Step 11. Calculating Total Hours
1. In the last column, add a row labeled Total Hours. First, merge the cell into one large cell and AutoFill the rest.


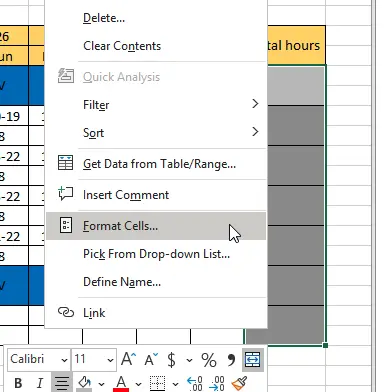
2. Select all these cells, right-click, and choose Format Cells.

3. In the “Number” section, set the decimal places to “0.”

4. To calculate the total hours for each employee, use the =SUM(…) formula.

5. Select the data range for each employee so the formula calculates their work hours.

– Be sure to close the parenthesis at the end of the data range and press Enter.

– Then, AutoFill the remaining cells by dragging downward.


Step 12. Counting Employees per Day
1. To count how many employees work on a specific day, use the =COUNT(…) formula.

2. Select the data range for one day, and the formula will count all cells with numeric values (excluding weekends and sick days).


3. Then, simply drag AutoFill from the calculated cell to have Excel count the number of employees for each day.


Now you know how to create a work schedule in Excel, add times, calculate hours, and highlight vacation and off days. This process can be significantly streamlined using AutoFill, conditional formatting, and formulas.


