This article covers the process of installing and configuring a TFTP server in the Windows operating system. The TFTP (Trivial File Transfer Protocol) is a simplified file transfer protocol that provides an easy way to upload and download files. It is commonly used for tasks such as network booting (PXE), network-based operating system installations, firmware updates for network equipment, and other specific tasks. TFTP is distinguished by its simplicity and high performance in file transfers, but it lacks security and authentication mechanisms.
Main Characteristics of TFTP
TFTP operates on port 69 (UDP) and does not provide management or security features. Its primary advantage is the simplicity of implementing the client side and high performance when transferring large files.
Running a TFTP Server in Windows
For quick deployment of a TFTP server in Windows, the free open-source utility Tftpd64 (or Tftpd32) is commonly used. This utility can be downloaded as a portable version or as an installation package.
Steps to Configure Tftpd64:
1. Download and run the executable file tftpd64.exe.
2. In the Tftpd64 interface, go to the Tftp Server tab and click the Settings button.
3. Select the directory you want to publish and set TFTP Security to None.
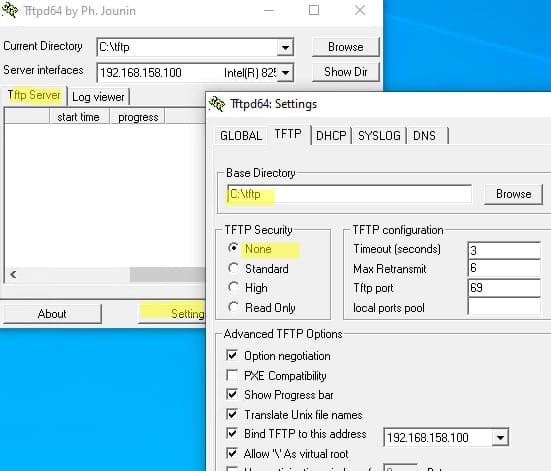
4. After changing the settings, restart the program.
5. Open port 69/UDP in Windows Firewall for incoming TFTP traffic. You can create an allowing rule using PowerShell:
New-NetFirewallRule -DisplayName 'TFTP-UDP-In' -Direction Inbound -Action Allow -Protocol UDP -LocalPort 69
Now the server is ready to accept connections for uploading or downloading files via TFTP.
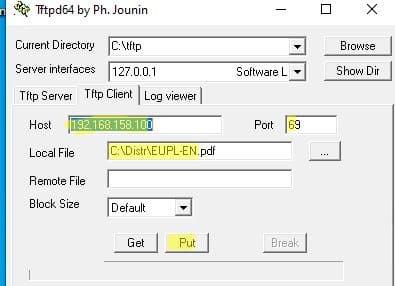
Using Tftpd64 as a TFTP Client
Tftpd64 can also be used as a TFTP client. To do this, go to the Tftp Client tab, specify the IP address of the TFTP server and the connection port (default is 69). You can now:
– Download a file from the server (Get);
– Upload a file to the server (Put).
To view connection logs, go to the Log Viewer tab.
Installing a TFTP Client in Windows
By default, the TFTP client is not installed in Windows. To install it on Windows 10 or 11, use the following PowerShell command:
Enable-WindowsOptionalFeature –FeatureName TFTP -Online

To install the TFTP client on Windows Server, use a different command:
Install-WindowsFeature TFTP-Client
After installation, you can use the tftp.exe utility to transfer files via TFTP.
Example Commands:
– Upload a file to the TFTP server:
tftp 192.168.1.100 PUT filename.txt
– Download a file from the TFTP server:
tftp 192.168.1.100 GET filename.txt
Installing the Built-in TFTP Server in Windows Server
Windows Server includes a built-in TFTP server as part of the Windows Deployment Services (WDS) role. It is used for network booting (PXE) and network-based Windows installations.
Steps for Installation:
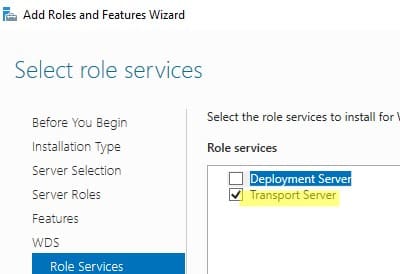
1. Open Server Manager and select Add Roles and Features Wizard.
2. Install the Windows Deployment Services (WDS) role.

3. In the WDS settings, select the Transport Server component.
4. After completing the installation, create a directory for the TFTP server files (e.g., C:\tftp).
5. Specify the path to the TFTP server’s root directory in the registry parameter RootFolder:
HKLM\SYSTEM\CurrentControlSet\services\WDSServer\Providers\WDSTFTP

6. In the ReadFilter parameter, you can specify directories from which file downloads are allowed. By default, downloads are permitted only from the \boot\ and \tmp\ directories. To allow downloads from other directories, add them to this parameter or set the value to \* for all directories.
Starting the TFTP Server:
1. Start the WDS service using the command:
Get-Service WDSServer | Start-Service
2. Configure the service to start automatically:
Set-Service WDSServer -StartupType Automatic
3. Verify that the service is running and listening on UDP port 69:
Get-Process -Id (Get-NetUDPEndpoint -LocalPort 69).OwningProcess
4. Ensure that the firewall rule for access to UDP port 69 is enabled:
(Get-NetFirewallRule -DisplayName 'Windows Deployment Services (UDP-In)').Enabled
Example of Using the Built-in Client:
Try downloading a file from the TFTP server using the built-in tftp.exe client:
tftp -i 192.168.158.10 GET test.zip
![]()
The main limitation of the built-in TFTP server in Windows Server is the inability to enable write access to the directory. This means clients can only download files from the TFTP server but cannot upload them.
This article covered the process of installing and configuring a TFTP server in Windows, using both third-party solutions and built-in Windows Server capabilities. TFTP is a simple and high-performance protocol, often used for firmware updates, network equipment maintenance, and PXE booting of operating systems. Despite its simplicity, TFTP has limitations, such as the lack of security and the inability to upload files to the built-in Windows Server TFTP server.