Many Windows administrators familiar with PKI infrastructure know the MakeCert.exe utility for generating self-signed certificates. This tool is part of the Microsoft .NET Framework SDK and Microsoft Windows SDK. In modern versions of Windows (11/10/8.1) and Windows Server (2022/2019/2016/2012R2), you can use built-in PowerShell cmdlets to create self-signed certificates without relying on third-party tools.
Creating a Self-Signed SSL Certificate in PowerShell
To create a self-signed certificate in PowerShell, use the New-SelfSignedCertificate cmdlet, which is part of the PKI (Public Key Infrastructure) module.
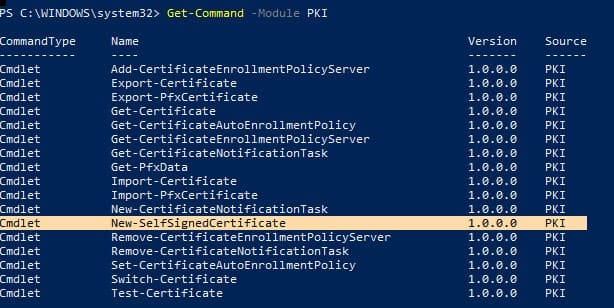
To list all available cmdlets in the PKI module, run:
Get-Command -Module PKI
Self-signed SSL certificates are typically used for testing or securing internal intranet services (IIS, Exchange, Web Application Proxy, LDAPS, ADRMS, DirectAccess, etc.) when purchasing a certificate from an external provider or deploying a full PKI infrastructure is not feasible.
Tip: You can also use free SSL certificates from Let’s Encrypt, which are suitable for use with IIS and other web servers.
To create a certificate, specify the -DnsName parameter (the server’s DNS name, which can be arbitrary and differ from localhost) and the -CertStoreLocation parameter (the certificate store location where the certificate will be placed).
To create a new SSL certificate with the DNS name test.contoso.com (fully qualified domain name) and add it to the computer’s personal certificate store, run:
New-SelfSignedCertificate -DnsName test.contoso.com -CertStoreLocation cert:\LocalMachine\My
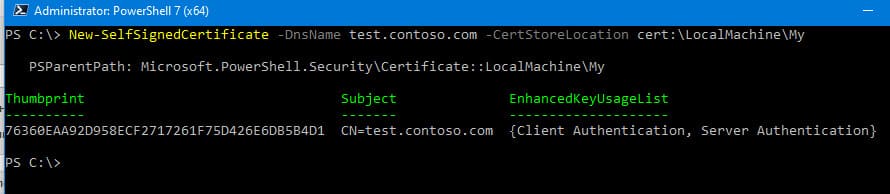
The command returns the certificate’s Thumbprint, Subject, and EnhancedKeyUsageList. By default, the certificate can be used for Client Authentication (1.3.6.1.5.5.7.3.2) or Server Authentication (1.3.6.1.5.5.7.3.1).
If the command is run without administrative privileges, you may encounter an error:
New-SelfSignedCertificate : CertEnroll::CX509Enrollment::_CreateRequest: Access denied. 0x80090010 (-2146893808 NTE_PERM)
When using a non-standard cryptographic service provider (CSP) (e.g., -KeyAlgorithm “ECDSA_secP256r1” -Provider ‘Microsoft Smart Card Key Storage Provider’), ensure it is installed on your computer. Otherwise, you may see an error:
New-SelfSignedCertificate: CertEnroll::CX509Enrollment::_CreateRequest: Provider type not defined. 0x80090017 (-2146893801 NTE_PROV_TYPE_NOT_DEF)
By default, a self-signed certificate is created with the following parameters:
– Cryptographic algorithm: RSA
– Key length: 2048 bits
– Key usage: Client Authentication and Server Authentication
– Certificate usage: Digital Signature, Key Encipherment
– Validity period: 1 year
– Cryptographic provider: Microsoft Software Key Storage Provider
This command creates and imports the certificate into the computer’s personal certificate store. To verify its addition, open the certlm.msc snap-in and check for the certificate in the Personal section.
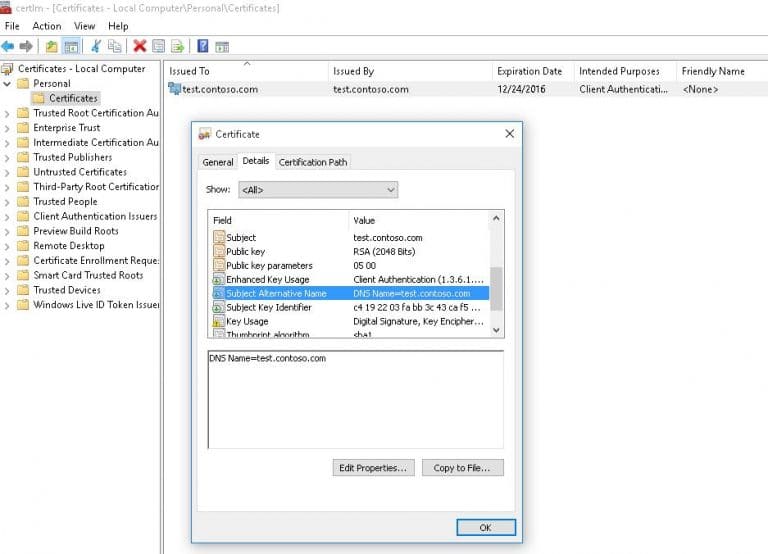
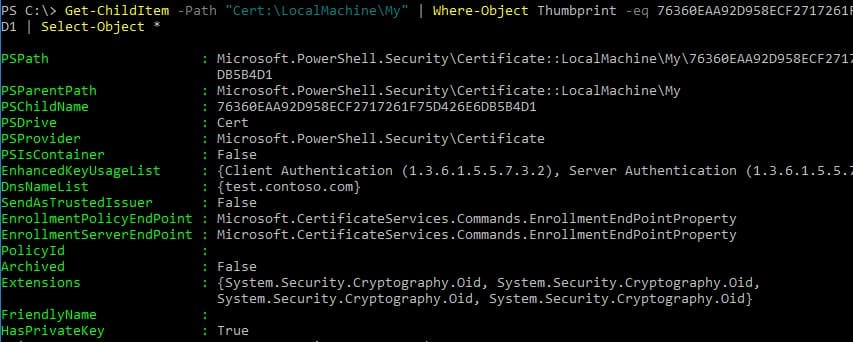
To view all properties of the created certificate using its Thumbprint, use the Get-ChildItem cmdlet:
Get-ChildItem -Path "Cert:\LocalMachine\My" | Where-Object Thumbprint -eq 76360EAA92D958ECF2717261F75D426E6DB5B4D1 | Select-Object *
Note: The default validity period of a self-signed certificate is 1 year from creation. To set a different validity period, use the -NotAfter parameter. For example, to create a certificate valid for three years, run:
$todaydate = Get-Date

$add3year = $todaydate.AddYears(3)

New-SelfSignedCertificate -DnsName test.contoso.com -NotAfter $add3year -CertStoreLocation cert:\LocalMachine\My
Creating a Certificate Chain
You can create a certificate chain by first generating a root certificate (CA) and then issuing an SSL server certificate based on it:
$rootCert = New-SelfSignedCertificate -Subject "CN=TestRootCA,O=TestRootCA,OU=TestRootCA" -KeyExportPolicy Exportable -KeyUsage CertSign,CRLSign,DigitalSignature -KeyLength 2048 -KeyUsageProperty All -KeyAlgorithm 'RSA' -HashAlgorithm 'SHA256' -Provider "Microsoft Enhanced RSA and AES Cryptographic Provider"

New-SelfSignedCertificate -CertStoreLocation cert:\LocalMachine\My -DnsName "test2.contoso.com" -Signer $rootCert -KeyUsage KeyEncipherment,DigitalSignature
To modify the key length and encryption algorithm, use the -KeyAlgorithm, -KeyLength, and -HashAlgorithm parameters:
New-SelfSignedCertificate -KeyAlgorithm RSA -KeyLength 2048 -HashAlgorithm "SHA256"
If a TPM 2.0 module is installed on the computer, it can be used to protect the key:
New-SelfSignedCertificate -Type Custom -Provider "Microsoft Platform Crypto Provider"
Creating a SAN (Subject Alternative Name) Certificate with PowerShell
The New-SelfSignedCertificate cmdlet can create a certificate with multiple Subject Alternative Names (SAN).
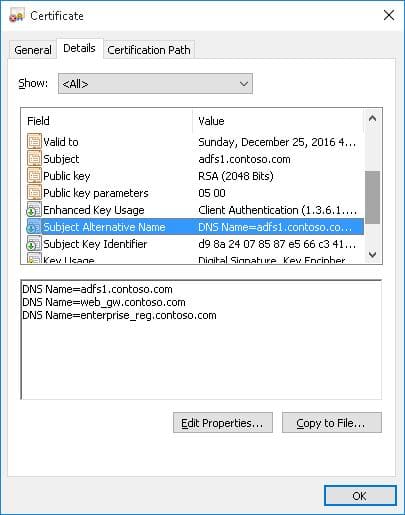
If the certificate includes multiple names, the first name in the DnsName parameter is used as the CN (Common Name). For example, to create a certificate with multiple names, run:
New-SelfSignedCertificate -DnsName adfs1.contoso.com,web_gw.contoso.com,enterprise_reg.contoso.com -CertStoreLocation cert:\LocalMachine\My
You can also create a wildcard certificate for an entire domain by specifying the server name as *.contoso.com:
New-SelfSignedCertificate -CertStoreLocation cert:\LocalMachine\My -DnsName *.contoso.com
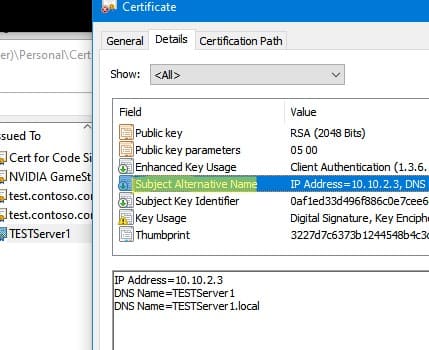
You can bind the certificate not only to a DNS name but also to an IP address using the -TextExtension parameter instead of -DnsName:
New-SelfSignedCertificate -TextExtension @("2.5.29.17={text}IPAddress=10.10.2.3&DNS=TESTServer1&DNS=TESTServer1.local")
As shown, the Subject Alternative Name field now includes the IP address.
Exporting a Self-Signed Certificate in Windows
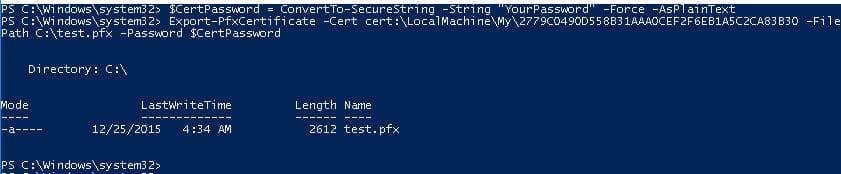
To export a certificate with its private key to a .pfx file protected by a password, obtain its Thumbprint. First, set a password and convert it to a SecureString format. The Thumbprint can be copied from the output of the New-SelfSignedCertificate command:
$CertPassword = ConvertTo-SecureString -String "YourPassword" -Force -AsPlainText

Export-PfxCertificate -Cert cert:\LocalMachine\My\2779C0490D558B31AAA0CEF2F6EB1A5C2CA83B30 -FilePath C:\test.pfx -Password $CertPassword
To export the certificate’s public key, run:
Export-Certificate -Cert Cert:\LocalMachine\My\2779C0490D558B31AAA0CEF2F6EB1A5C2CA83B30 -FilePath C:\testcert.cer
Verify that the CER (or PFX) file has been created in the specified directory. Right-click the file and select Install Certificate to use the Certificate Import Wizard to add it to the computer’s Trusted Root Certification Authorities.
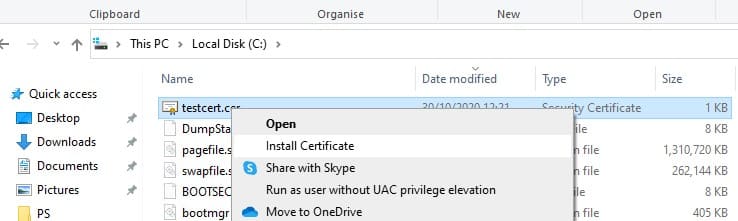
Select Store location → Local Machine, then Place all certificates in the following store → Trusted Root Certification Authorities.

Creating a Code Signing Certificate
Starting with PowerShell 5, the New-SelfSignedCertificate cmdlet can be used to create Code Signing certificates:
$cert = New-SelfSignedCertificate -Subject "Cert for Code Signing" -Type CodeSigningCert -CertStoreLocation cert:\LocalMachine\My
To sign a PowerShell script with this certificate, use:
Set-AuthenticodeSignature -FilePath C:\PS\test_script.ps1 -Certificate $cert
If an UnknownError warning appears, the certificate is untrusted because it resides in the user’s personal certificate store.

Move it to the root certificate store (and periodically check the Windows certificate store for untrusted certificates and update the root certificate lists):
Move-Item -Path $cert.PSPath -Destination "Cert:\CurrentUser\Root"
You can now use this self-signed certificate to sign PowerShell scripts, drivers, or applications.
Creating a SHA-256 Self-Signed SSL Certificate for IIS
When creating a self-signed certificate for IIS via the Internet Information Services (IIS) Manager console (Create Self-Signed Certificate option), it uses the SHA-1 algorithm, which many browsers consider insecure. To create a certificate with the SHA-256 algorithm, use the New-SelfSignedCertificate cmdlet.

You can bind a SHA-256 self-signed certificate created in PowerShell to a website in IIS. Certificates placed in the computer’s certificate store are automatically available for IIS sites.

Open the IIS Manager console, select the site, go to Site Bindings, specify the created certificate, and save the changes.
To bind an SSL certificate to a site using its thumbprint, run:
New-IISSiteBinding -Name "Default Web Site" -BindingInformation "*:443:" -CertificateThumbPrint $yourCert.Thumbprint -CertStoreLocation "Cert:\LocalMachine\My" -Protocol https