RAID 3 is a level of RAID (Redundant Array of Independent Disks) technology designed to enhance data storage performance and/or reliability. Unlike other RAID levels, RAID 3 uses parallel access with a dedicated disk for storing parity information.
How RAID 3 Works
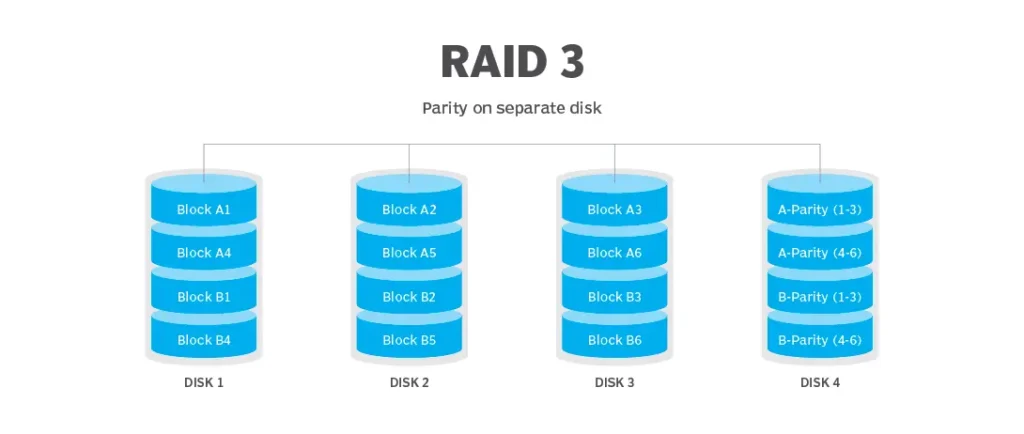
Data Striping
– Data is divided into small blocks (e.g., 512 bytes or 1 KB).
– Each block is written to a separate disk in the array.
– Example: In a RAID 3 array with 4 disks (3 for data, 1 for parity):
– Disk 1: Block 1
– Disk 2: Block 2
– Disk 3: Block 3
– Disk 4: Parity for blocks 1, 2, and 3 (computed using XOR).
Parity
– RAID 3 uses a dedicated disk for parity, calculated via the XOR operation across all data blocks.
– If one disk fails, data can be recovered using the remaining disks and the parity disk.
Parallel Access
– All disks operate synchronously, processing the same read or write operation simultaneously.
– This is particularly effective for sequential data transfers (e.g., large files, streaming media).
Advantages of RAID 3
– High sequential data transfer speed: Ideal for applications handling large data volumes (e.g., video editing, streaming, multimedia processing).
– Fault tolerance: Data can be recovered from a single disk failure using the remaining disks and parity.
Disadvantages of RAID 3
– Poor random access performance: Synchronous disk operation slows down small, random operations.
– Parity disk bottleneck: The dedicated parity disk can become a performance bottleneck, especially during intensive write operations.
– Limited flexibility: Requires at least 3 disks (2 for data, 1 for parity), with limited scalability, as adding more parity disks does not enhance performance or reliability.

RAID 3 in Windows
Modern versions of Windows do not include built-in tools for creating RAID 3. However, you can use third-party software or hardware solutions, such as:
– Storage Spaces: A built-in Windows feature for creating fault-tolerant arrays, but it does not support RAID 3.
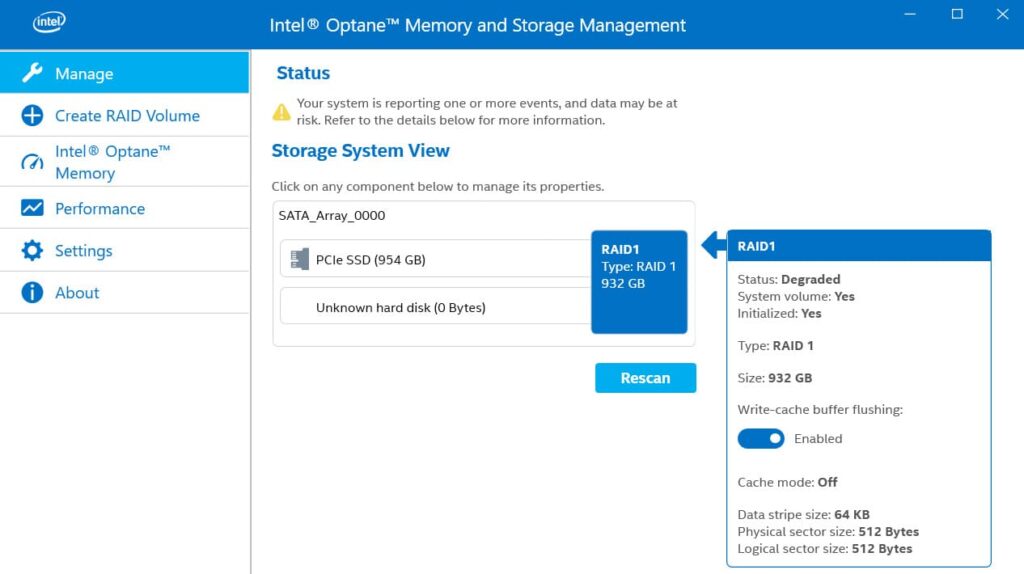
– Third-party software: Programs like Intel Rapid Storage Technology or hardware RAID controllers that may support RAID 3.
When to Use RAID 3
RAID 3 is suitable for tasks involving large sequential operations, such as:
– Video editing.
– Streaming data processing.
– Archiving large files.
However, due to its poor random access performance and outdated nature, RAID 3 is rarely used. Modern alternatives like RAID 5 (distributed parity) or RAID 10 (mirroring and striping) are considered more versatile and reliable.
Setting Up RAID 3 in Windows
Since Windows’ built-in tools, such as Storage Spaces, do not support RAID 3, you must rely on third-party software or specialized hardware RAID controllers. Here are two options:
1. Hardware RAID Controllers
The most reliable way to implement RAID 3 is using a hardware RAID controller that supports this level. Popular brands include:
– Adaptec by Microchip (e.g., Adaptec 8805 or 6405).
– LSI/Avago/Broadcom (e.g., LSI MegaRAID).
– Dell PERC Controllers (used in Dell PowerEdge servers).
– HP Smart Array Controllers.
These controllers often include software for configuring RAID arrays and may support RAID 3. Check the controller’s documentation to confirm RAID 3 support.

Steps to Set Up RAID 3 with a Hardware Controller
1. Install the RAID controller in your system and connect the required number of disks (minimum 3).
2. Boot the system and enter the RAID controller’s configuration utility (usually accessed via a specific key combination, e.g., Ctrl+R or Ctrl+I during startup).
3. Select RAID 3 as the array type, if supported.
4. Configure the array by selecting the data disks and the dedicated parity disk.
5. Save the configuration and initialize the array.
6. Install Windows on the RAID array or use it as a secondary storage volume.
7. Install the RAID controller’s management software in Windows for ongoing maintenance.
2. Third-Party Software Solutions
For software-based RAID 3 in Windows, you can use applications like:
– SoftRAID (for Windows): A RAID management software by OWC that supports multiple RAID levels, including RAID 3.
Steps to Set Up RAID 3 with SoftRAID
1. Download and install SoftRAID from the official website.
2. Connect at least three disks to your system.
3. Open SoftRAID and select the option to create a new RAID array.
4. Choose RAID 3 as the array type.
5. Select the disks for data and the dedicated parity disk.
6. Configure any additional settings (e.g., block size) as needed.
7. Initialize the array and format it for use in Windows.
8. Monitor and manage the array using the SoftRAID interface.
– Hardware vs. Software RAID: Hardware RAID controllers are generally more reliable and performant, as they offload processing from the CPU. Software RAID, like SoftRAID, is more flexible but may impact system performance.
– Disk Requirements: Ensure you have at least three disks with sufficient capacity. All disks should ideally have the same size and speed for optimal performance.
– Backup: Before setting up RAID 3, back up all data, as creating a RAID array will erase the disks.
– Performance Monitoring: After setup, monitor the array’s performance to ensure it meets your needs, especially for sequential data tasks.
Due to its limitations, consider whether RAID 5 or RAID 10 might better suit your needs before committing to RAID 3. If RAID 3 is necessary, hardware RAID controllers are the recommended approach for stability and performance.